Expert in TIE & DYE
Blog Posts
🧪 Our Eco-Dyeing Practices Include:
✅ Natural Dyes from Indigenous Plants
We source and process botanical colorants including:
🌿 Indigofera tinctoria – traditional African indigo for deep blues
🌺 Hibiscus petals – rich purples and burgundy hues
🧡 Turmeric root – vibrant yellows with antiseptic properties
🌰 Kola nuts and barks – earthy browns and muted reds
These dyes are biodegradable, non-toxic, and culturally authentic.
✅ Low-Impact Synthetic Dyes
When higher vibrancy or durability is needed, we use fiber-reactive dyes that require cold water and less rinsing, reducing overall water waste and energy usage.
✅ Closed-Loop Water Systems (In Development)
Our long-term goal is to implement a closed water filtration system for all studio dye work — reusing rinse water and reducing pollution. Innovation with responsibility.
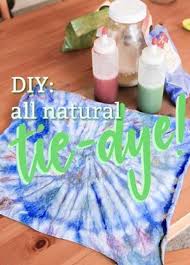
🌿 Dyeing Responsibly: Our Commitment to Eco-Friendly Dyes
Where African tradition meets environmental innovation.
At Dyenamic Design, our fabric speaks in color — but it also speaks in conscience. We understand that sustainability isn't a trend — it's a necessity. That’s why we proudly use environmentally friendly dyes in our tie-and-dye production process, staying true to both cultural preservation and planet protection.
🌍 Why It Matters
Conventional textile dyes are one of the largest polluters in global fashion. Toxic runoff, chemical-heavy processes, and non-biodegradable waste are devastating to local water systems and artisan communities — particularly in Africa, where these traditions originate.
Our alternative? A return to nature, inspired by how our ancestors did it — slow, soulful, and sustainable.
💚 Culture with a Clean Conscience
Eco-dyeing is not just a technical process — it’s a philosophy. It’s about respecting the land that gives us these colors, the hands that apply them, and the communities that wear them.
By choosing environmentally friendly dyes, we:
Reduce toxic waste in our local environments
Protect artisan health
Support sustainable sourcing practices
Preserve ancient dye techniques threatened by industrial shortcuts
🤝 Our Pledge to You
Every time you wear Dyenamic Design, you’re not just making a style statement — you’re supporting a cultural and ecological legacy that values craft, care, and consciousness.
Because true beauty doesn’t cost the earth.
🧼 Pro Tips for All Styles:
Use 100% cotton for best dye absorption.
Soak fabric in soda ash before dyeing to lock in color.
Wash separately the first few times to avoid bleeding.
Always protect your workspace — dye is beautiful, but messy!
2. The Village Grid Fold
Inspired by: African mud cloth and woven kente gridlines
How to do it:
Fold your bandana accordion-style in one direction.
Then fold it again to form a square or rectangle.
Bind with string or clamp with clips.
Apply dye to corners or edges for a checkered or framed look.
🧵 Cultural Cue: Reflects order, wisdom, and community structure.
3. The Tribal Sunburst
Inspired by: Traditional tribal celebrations and the energy of African festivals
How to do it:
Pull a small section of the bandana from the center and tie it tightly with rubber bands every few inches — like making a caterpillar.
Use bright yellows, oranges, and reds to create a sunburst effect.
Let it process for rich saturation.
🔥 Perfect for: Festival wear or vibrant youth fashion.
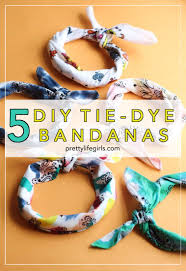
5 Simple Tie-Dye Bandanas You Can Make at Home
Bandanas are a perfect canvas for bold color expression and cultural storytelling. Lightweight, versatile, and highly wearable, they’re great for beginners or anyone wanting to add an Afrocentric edge to their look.
1. The Sankofa Spiral
Inspired by: The Ghanaian Adinkra symbol Sankofa (“return and get it”)
How to do it:
Pinch the center of the bandana and twist it into a tight spiral.
Secure with 3–4 rubber bands, forming a pizza-like shape.
Apply bold colors (e.g., black, red, gold) in alternating sections.
Let it sit for 6–8 hours before rinsing.
🌀 Symbolic Style: This bandana speaks to those reconnecting with their heritage.
4. The Ancestral Crumple
Inspired by: The randomness of nature, like Ghana’s river paths and Baobab tree bark
How to do it:
Loosely crumple the bandana into a ball and bind it randomly with string.
Splash different colors over the surface for a marbled effect.
Embrace imperfection — each result is one of a kind.
🌍 Why it matters: Represents the organic flow of life and ancestral spontaneity.
5. The Pan-African Stripe
Inspired by: The Pan-African flag (red, black, green) and liberation aesthetics
How to do it:
Fold the bandana in straight horizontal pleats.
Apply stripes of red, black, and green using squeeze bottles.
Let it process and rinse gently to maintain clean edges.
✊🏾 Wear with purpose: A strong symbol of unity, resistance, and pride.
What You’ll Need: The Essentials
Materials:
100% cotton fabric or T-shirt (natural fabrics absorb dye better)
Fabric dye (fiber-reactive dye or natural plant-based dye)
Water and salt (or soda ash fixer if using professional dye)
Buckets or plastic squeeze bottles
Rubber bands or string
Protective gloves
Plastic sheet or newspaper to cover your workspace
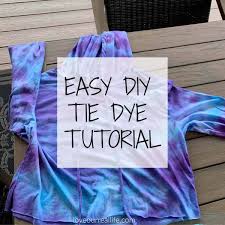
How to Make Simple Tie and Dye at Home: A DIY Guide Inspired by African Craftsmanship
Tie and dye isn't just an art — it's a cultural ritual rooted in centuries of African creativity. From the indigo pits of West Africa to the vibrant marketplaces of Ghana, this technique has been used to convey identity, status, spirituality, and celebration. Today, we invite you to try a simplified version of this powerful craft — right from the comfort of your home. This guide blends traditional wisdom with modern accessibility. Whether you’re an art student, fashion lover, or cultural explorer, you’ll learn how to create beautiful, hand-dyed fabrics that reflect your personal style and ancestral inspiration.
🌍 What You’ll Need:
100% cotton or linen pillowcase (preferably white or off-white)
Fiber-reactive dyes or natural dyes (e.g., indigo, kola nut, hibiscus, or turmeric)
Rubber bands or string
Gloves
Buckets or bowls
Plastic squeeze bottles
Plastic sheet or tray to protect your surface
Soda ash solution (for pre-soaking)
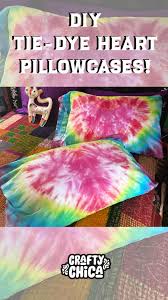
DIY Tie-Dye Pillowcase: Culture You Can Sleep On
Add a touch of heritage and handmade beauty to your space with a custom tie-dye pillowcase. This project is beginner-friendly, budget-conscious, and bursting with Afrocentric flair.
Step-by-Step Instructions:
1. Prepare Your Fabric
Wash the pillowcase with mild soap to remove any factory coating or oils. Soak it in a soda ash solution for 30 minutes to help the dye bind better to the fibers.
2. Choose a Folding Pattern
Here are 3 culturally inspired folding styles:
Adinkra Burst: Pinch the center and spiral into a disk. Use bold colors like burgundy, deep indigo, and gold.
Village Lines: Fold into even pleats and bind tightly in 3 sections. Apply linear dye patterns for a structured, Kente-like look.
Ancestral Crumple: Scrunch the pillowcase randomly and tie at 5–6 points. Ideal for showcasing natural dyes and earthy tones.
3. Apply the Dye
Use your chosen colors and apply them using squeeze bottles or by dipping sections directly into dye baths. Let the dyes blend and bleed for organic beauty — imperfection adds character.
4. Let It Set
Wrap the pillowcase in plastic and allow it to sit for at least 6 to 8 hours, or overnight for richer saturation.
5. Rinse and Reveal
Unwrap the case, rinse under cold water until the water runs clear, then do a light wash with mild soap. Air dry in the shade.

Explore DIY textile design techniques rooted in African tradition, made easy for beginners.
Basic Materials You’ll Need:
To get started at home, here’s what you’ll need:
100% cotton fabric or a plain white T-shirt
Fiber-reactive dyes (or natural dyes like indigo, turmeric, or hibiscus for a cultural twist)
Rubber bands or string
Plastic squeeze bottles
Gloves
Buckets or bowls
Soda ash (helps the dye set)
Water and a covered work surface (e.g., plastic sheet)
How to Make Simple Tie and Dye at Home — The Dyenamic Way
What Is Tie and Dye? Tie and dye is more than just a craft — it's an ancient form of storytelling, expression, and identity. In many African cultures, especially in Ghana and Nigeria, the art of dyeing is deeply symbolic and spiritual. At Dyenamic Design, we see tie and dye not just as fabric art, but as a connection to our ancestors.
✨ Other DIY Textile Projects to Try:
Tie and Dye Scarves or Headwraps (Great for gifts or events!)
Dye Your Own Tote Bags for eco-friendly fashion
Create Wall Art by stretching dyed fabric on wooden frames
DIY Ankara + Dye Hybrid: Sew dyed panels with printed African wax fabric for unique cultural fusion pieces
✂️ Dyenamic DIY Tips for Better Results:
Use African-inspired color palettes: Think earth tones, bold reds, royal blues, and golds. These colors symbolize power, spirituality, and heritage.
Try layering patterns for depth. Combine stripes with spirals or crumples with pleats.
Add a cultural edge by stenciling Adinkra symbols or tribal prints onto dyed fabric using fabric paint.
Upcycle old clothes — turn old white shirts, dresses, or even bedsheets into Afro-futurist artwear.
🌀 Simple Steps to Make Your Own Tie and Dye:
1. Pre-wash the Fabric
This removes any chemicals or oils that could block dye absorption. Use mild soap and rinse well.
2. Prepare the Dye Fixative (Soda Ash Bath)
Soak the fabric in a mixture of soda ash and water for about 15–30 minutes. This helps the dye bond to the fabric fibers.
3. Choose Your Folding Technique
Here are a few simple traditional styles you can try:
Spiral (Sun Style): Pinch the center of the fabric and twist it into a flat spiral. Secure with rubber bands in a pizza-slice shape.
Stripe (Ghanaian Folding): Fold fabric like an accordion in long panels, then bind at intervals.
Bullseye: Pinch the center, pull upward, and tie rubber bands at intervals down the “tube.”
Random Crumple (Adire-inspired): Scrunch the fabric loosely and bind randomly.
4. Mix and Apply the Dye
Mix your chosen colors in squeeze bottles or bowls. Apply them generously into each section, letting colors blend naturally or stay in segments.
🌿 For a natural twist, try boiling hibiscus leaves or African indigo with water and salt — it’s how our ancestors did it!
5. Let It Set
Place your dyed fabric in a sealed plastic bag or wrap in cling film. Let it sit for 6–24 hours so the colors can fully develop.
6. Rinse and Wash
Rinse the fabric with cold water first, then warm water until the water runs clear. Wash with mild detergent and air-dry.